 全球服务器测评
什么是CMI线路?CMI线路和CN2线路哪个好?一文看懂两大精品网络线路区别
随着跨境电商、海外建站、国际业务以及云计算应用不断发展,越来越多用户开始购买香港服务器、日本服务器、新加坡服务器以及美国服务器等海外云服务器。在选购过程中,很多商家都会重点宣传服务器采用了CMI线路、CN2线路、CN2 GIA、精品网等网络...
 djvps820
海外抖音TikTok专用服务器怎么选?从线路、IP、网络到配置一次讲清楚
海外短视频营销以及品牌出海的发展,TikTok已经成为全球流量增长最快的平台之一。越来越多的企业、MCN机构、独立站卖家以及个人创作者开始布局TikTok,希望借助平台庞大的用户群体获取更多曝光和订单。 不过,在真正开始运营之后,很多人都会...

AS9929线路、AS4837线路、CUVIP、CIA线路,它们之间到底有什么区别
随着国内企业出海、跨境电商、海外游戏、TikTok运营以及海外云服务器需求不断增长,越来越多用户开始关注服务器的网络质量。很多人在购买香港、日本、新加坡、美国等地区的云服务器时,除了CPU、内存、带宽之外,还会发现商家经常宣传”...

虚拟机下CentOS 6.5配置IP地址几种方法
虚拟机环境中给 CentOS 6.5 配置 IP 地址,是很多人第一次接触 Linux 网络管理时绕不开的一步。尤其是在 VMware 或 VirtualBox 里安装好系统之后,经常会发现一个问题:系统能启动,但无法联网,或者只能使用 D...

CentOS6下配置Spark+Python开发环境
一、环境准备与系统基础处理 在CentOS 6上搭建Spark开发环境,本身就是一件比较“老系统工程”的事情。这个系统的生命周期已经结束很久,很多现代工具链都已经不再直接支持它,但在一些历史项目或者内网集群中仍然可以见到它的身影。整个环境的...

CentOS 8.1下搭建LAMP环境(Linux + Apache + MySQL + PHP)
CentOS 8.1下搭建LAMP环境(Linux + Apache + MySQL + PHP)这件事,说简单也简单,说麻烦也确实能折腾一整天。尤其是对刚接触服务器部署的人来说,从系统依赖、软件源、版本兼容到服务启动顺序,每一步都可能卡住...

CentOS 7 搭建 Docker 私有仓库及镜像管理与删除
Docker镜像的使用已经成为日常部署的基础手段,但当镜像全部依赖 Docker Hub 或第三方公共仓库时,会逐渐暴露出带宽受限、拉取速度慢、镜像不可控以及安全审计困难等问题。尤其是在内网环境或者对数据安全要求较高的生产系统中,搭建一个属...

Ubuntu / CentOS 系统上安装与配置 Nginx
在服务器环境里,Nginx 基本已经成为 Web 服务的默认选择之一,不管是做静态站点托管、反向代理、负载均衡还是作为 API 网关入口,它都能提供稳定且高性能的表现。尤其是在 Ubuntu 和 CentOS 这两类主流 Linux 发行版...
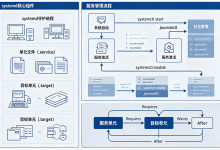
Debian systemd 服务体系深度解析
在日常 Linux 运维中,Debian系统的服务管理是绕不开的一环。无论是部署网站、运行数据库,还是维护后台任务,最终都会落到“服务如何启动、如何稳定运行、如何排障”这些具体问题上。而 systemd 作为 Debian 目前默认的初始化...
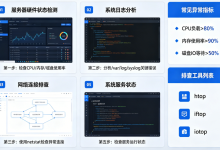
Debian服务器性能异常排查
在实际运维中,Debian服务器的性能问题往往不会以“明确报错”的形式出现,而是以一种逐渐恶化的方式暴露出来,比如网站响应变慢、SSH 登录卡顿、接口偶发超时、数据库查询时间变长,甚至在高峰期出现服务短暂不可用。这类问题最麻烦的地方在于,它...