 全球服务器测评
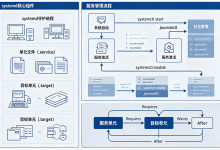
Debian systemd 服务体系深度解析
在日常 Linux 运维中,Debian系统的服务管理是绕不开的一环。无论是部署网站、运行数据库,还是维护后台任务,最终都会落到“服务如何启动、如何稳定运行、如何排障”这些具体问题上。而 systemd 作为 Debian 目前默认的初始化...
 djvps820
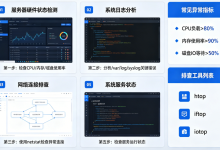
Debian服务器性能异常排查
在实际运维中,Debian服务器的性能问题往往不会以“明确报错”的形式出现,而是以一种逐渐恶化的方式暴露出来,比如网站响应变慢、SSH 登录卡顿、接口偶发超时、数据库查询时间变长,甚至在高峰期出现服务短暂不可用。这类问题最麻烦的地方在于,它...
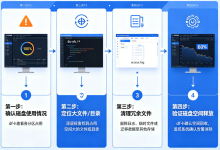
Linux服务器磁盘爆满全流程处理
一、问题出现时的第一反应:先别急着删文件 服务器磁盘空间告急这件事,很多人第一次遇到的时候都会比较慌,尤其是线上业务正在跑,日志突然写不进去、数据库报错、网站开始500,这时候最容易做的错误操作就是“看到大文件就删”,或者直接清空日志目录。...
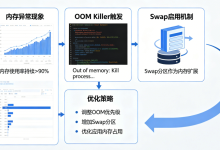
Linux服务器内存异常飙高从OOM Killer到Swap优化
Linux服务器跑久了之后,最常见的一个“隐性问题”就是内存看起来越来越紧张,有时候top一看,内存几乎被吃满,但业务又没明显增长;更糟糕的是,系统突然卡顿甚至SSH都连不上,日志里一翻才发现是 OOM Killer 出手把进程直接杀了。很...
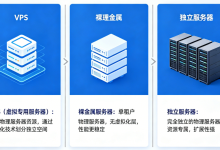
VPS、裸金属与独立服务器:三种主机架构的性能差异
在实际的服务器选型中,很多人第一反应是“CPU够不够强、带宽够不够大”,但真正影响业务体验的,往往不是单一参数,而是底层架构的差异。VPS、裸金属服务器、独立服务器这三种形态,看似都能提供“服务器”,但它们在资源分配方式、性能稳定性、隔离性...
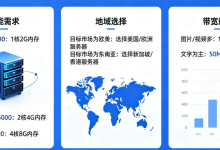
外贸独立站服务器怎么选?美国服务器vs香港服务器深度对比
在做跨境独立站或者外贸网站的时候,服务器选在哪里几乎是一个绕不开的问题。很多人一开始会简单理解为“美国服务器全球更快”“香港服务器国内更快”,但如果真的要做一个面向全球客户的业务站,这个问题远比想象中复杂。它不仅涉及延迟,还涉及线路质量、目...

香港低延迟游戏服务器实战搭建MC / 幻兽帕鲁 / CS2 私服一体化部署
一、为什么选择香港节点做游戏服务器 很多人一开始做游戏服务器,都会优先选国内或日本节点,但真正跑起来之后才会发现一个现实问题:国内线路虽然稳定,但对外网玩家不友好,而日本、新加坡虽然延迟也不错,但在高峰期经常出现绕路和波动。香港节点的优势就...

Linux系统如何修改远程SSH端口
Linux服务器而言,SSH几乎是管理员每天都会使用的远程管理工具。无论是云服务器、VPS、独立服务器还是企业内部Linux主机,SSH都承担着远程登录、文件传输、系统维护以及自动化运维的重要工作。 然而,很多Linux系统在安装完成后都会...

Ubuntu 22.04 LTS安装Nginx服务从环境准备到生产部署
Linux服务器的用户来说,搭建Web服务通常是服务器运维学习过程中的第一步。而在众多Web服务器软件中,Nginx凭借高性能、低资源占用以及优秀的并发处理能力,已经成为当前互联网最主流的Web服务器之一。 无论是搭建企业官网、部署Word...

Ubuntu服务器网络配置使用Netplan实现DHCP自动获取与静态IP固定部署
在Linux服务器运维工作中,网络配置属于最基础也是最重要的管理内容之一。无论是企业内部业务系统、云服务器环境、网站托管平台,还是数据库服务器部署,都需要依赖稳定可靠的网络连接才能正常运行。 对于长期使用CentOS系统的运维人员来说,早期...